How to create a Gallery of Images and present it as a Video Slideshow?

Andrea
Last Update hace 2 meses
Select Media -> Gallery, from side menu.
Here you can upload photos related to your Tour and present them as Gallery of Images or Video Slideshow.

In Gallery of Images you can change these settings:
Transition: Select the animation style used when moving between images. Thumbnails: Choose if and where the preview thumbnails should appear. Options like Bottom Over Media allow users to see a small preview of all images in the gallery at once for easier navigation. Download: Enable this checkbox if you want to allow viewers to download the original image files directly from the gallery. Autoplay: Toggle this on to have the gallery automatically cycle through the images without requiring user interaction. Slide Duration (s): If Autoplay is enabled, set the number of seconds each image remains on the screen before transitioning to the next.

After you've made your changes click on Save.
To generate a video slideshow within the same images scroll down to Video Slideshow section.
Now you can change these settings:
- Resolution: Select the output quality of the video (e.g., 1080p).
- Aspect Ratio: Choose the frame shape. Use 16:9 (Horizontal) for traditional screens or 9:16 (Vertical) for mobile stories and reels.
- Slide Duration (s): Set how many seconds each image remains on screen.
- Fade Duration (s): Adjust the timing of the transition effect between slides for a smoother or snappier feel.
- Zoom Rate: Use the slider to apply a "Ken Burns" effect, adding subtle movement (zooming in or out) to each slide to make the video more dynamic.
- Watermark: Choose the position of your brand logo (e.g., Top Right).
- Watermark Opacity: Use the slider to adjust the transparency of your logo.
- Audio: Select a background music track from the library.
- Sync with Audio: Click this button to automatically adjust the Slide Duration so that image transitions align with the beat or tempo of your chosen music track.
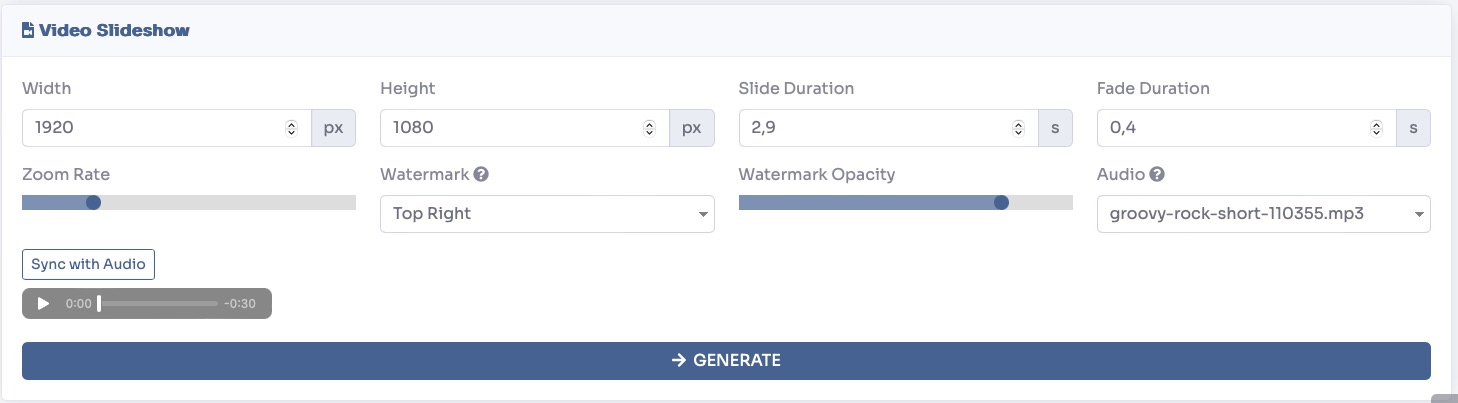
Once you've set the properties of the video click Generate to get your video.
After the video has been generated it will be shown to the right of this section and you will be able to download it.

You can change the Gallery Mode by clicking on the one you want to appear on your tour.

Once you have configured your gallery settings, you must enable the gallery widget within the tour's user interface so that it is visible to your viewers.
Navigate to Virtual Tours > Editor UI from the sidebar menu.
Click the Gallery icon on bottom left and set Show to Visible.

You can view a live preview of video slideshow in this demo