How to connect Rooms (Markers) in a Tour?

Andrea
Last Update há 2 meses
During viewing of a virtual tour, the user should feel as if they are actually taking such a tour. To achieve this, after created all he rooms, you need to prepare suitable navigation between them.
Markers are used to navigate through the virtual tour: these are clickable points that allow the user to move to the next location.
Select Virtual Tours -> Markers, from the side menu.
You have three different ways to add a new marker:
- Top menu: Click the + icon in the top right corner.
- Room list: Click the + icon next to your target room in the list.
- Drag and drop: Click and drag the target room directly from the list into your scene.

In the Add Marker window, you can configure the details for your new navigation marker. You can customize the following settings:
- Style: Choose how the marker will look (either an Icon or a Selection Area).
- Look At: Automatically move the user's view in the direction of the clicked marker.
- Room Target: Select the destination room the marker will lead to when clicked.
- Override Initial Position: Set a specific starting view for the target room when the user enters via this marker.
- Animate Target Position: Animate the camera moving to the target position upon entering the room, and set the duration of the animation.
- Add Marker to go back: Automatically create a return marker in the target room so users can easily navigate back.
Click the + Add button to save and place your marker.

Once you've added your marker, you can easily modify it by clicking on it in the scene. A small menu will appear above the marker with the following options:
- Move: Reposition the marker to a new spot in the room.
- Edit: Open the settings window to change the marker's properties.
- Duplicate: Create an exact copy of the marker.
- Delete: Remove the marker from your tour.
- Go to target room: Instantly navigate to the destination room linked to the marker.

When you click the Move icon, you can freely drag the marker to a new location within the room. While making these adjustments, you can also set the following properties:
- Perspective: Adjust the 3D angle so the marker aligns naturally with the room's geometry.
- Size: Change the overall dimensions of the marker.
- Visibility: Control whether the marker is shown or hidden.
- Z Order: Set the stacking order, which determines which element appears in front if multiple markers overlap.
- Scale: Fine-tune the visual proportions of the marker.
- Sticky: Keep the marker pinned to the edge of the screen when it moves out of the user's direct field of view, so they always know which direction to look.
- Bulk move all: Apply your current movement to all other markers in the room simultaneously.

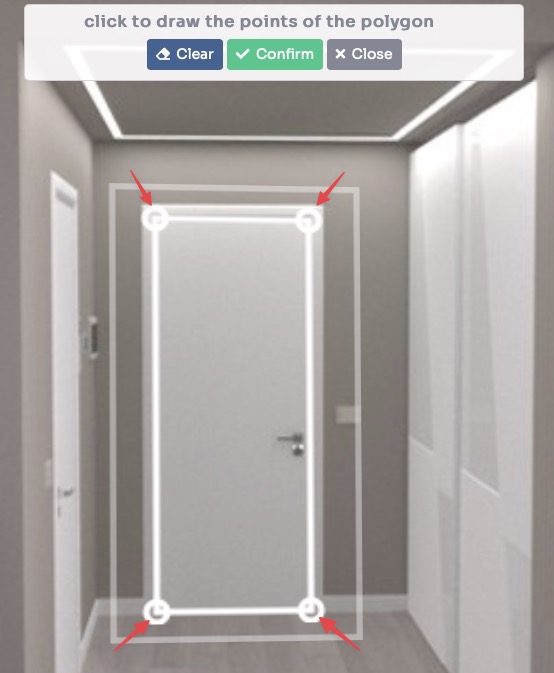
If you have chosen "Selection area" as style, first define the area in which you will draw the navigation element.
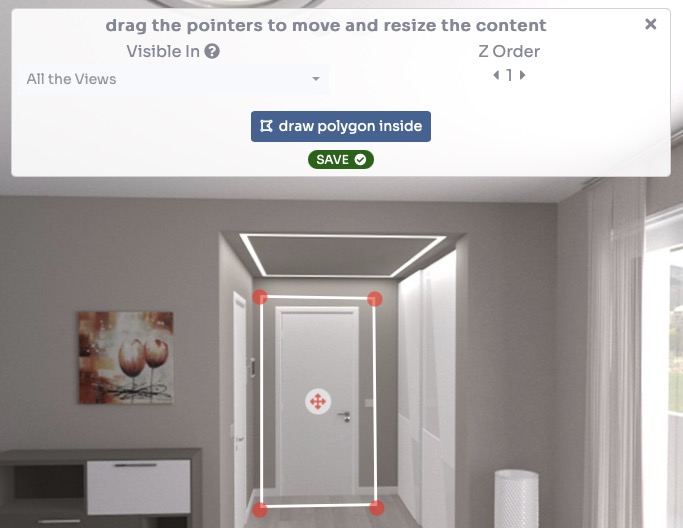
Then, draw any shape you like.
Clicking the Edit icon opens a pop-up window organized into three tabs, allowing you to customize different aspects of your marker:
- Settings: Change the marker type or update the destination room it links to.
- Style: Customize the visual appearance and design of the marker icon.
- Tooltip: Add descriptive text or a preview image of the target room that will appear when a user hovers their cursor over the marker.


Click on Save.
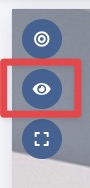
After adding markers to all the rooms, you can test the navigation in your virtual tour by clicking the eye icon (preview) on top left.
You can now insert contents to your tour with POIs.
See How to add contents (POIs) into a Room? tutorial.