How to create a Showcase?

Andrea
Last Update hace 2 meses
Use the Showcases feature to create a centralized, dedicated space to organize and present all of your virtual tours in a single portfolio or gallery.
Select Publish -> Showcases, from the side menu.
Click the + icon located in the top right corner of the screen.
In the window that appears, enter a title into the Name field.
Click the + Create button to confirm and save your new item.


After creating your new showcase, you will be automatically redirected to the settings page. Here, you can configure the design, sorting behavior, and overall structure of your gallery:
- Name: Enter a custom title for your showcase.
- Background Color: Choose the solid background color for the showcase page.
- Open Target: Choose how the virtual tours open when a user clicks on them (e.g., in the same window or a new tab).
- Sorting Mode: Select the specific filtering or sorting options you want to make available to the user.
- Default Sorting: Choose the automatic sorting order for your tours (such as by Date) when the page first loads.
- Default Language: Set the primary language for your showcase interface.
- Languages Enabled: Select all the alternative languages you want to make available for your viewers.
- Google Analytics Tracking ID: Input your GA tracking code to monitor visitor traffic and interactions on your showcase page.
- Enable Cookie Consent: Check this box to display a standard cookie consent banner for privacy compliance.
- Enable PWA: Check this box to enable Progressive Web App functionality, allowing users to install the showcase directly on their devices.
- Custom HTML Header: Inject custom HTML code to display personalized content, formatted text, or links at the very top of the showcase page.
- Custom HTML Footer: Inject custom HTML code to display personalized content, copyright information, or links at the bottom of the showcase page.
- Logo: Upload your custom image or company logo to brand the showcase page.
- Banner Image: Upload a large feature image to display prominently as a header banner across your showcase.

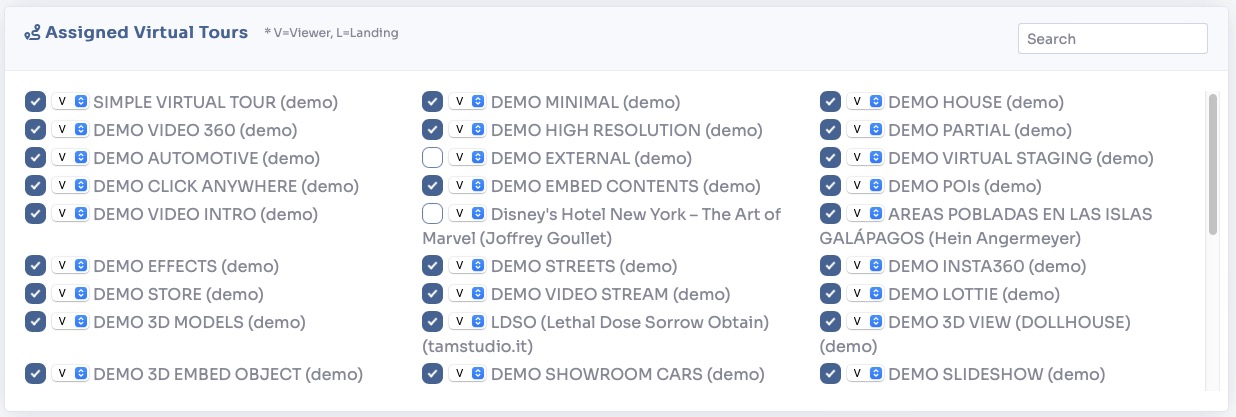
To assign virtual tours to the showcase page, simply select the desired ones from the list of tours, choosing for each one whether to show the tour (V) or its landing page (L).
Scrolling further down the page you will find sections to change the showcase's meta tags and publish link /embed code.
You can view a live preview of showcase here